728x90
반응형
1. 프로젝트 개요
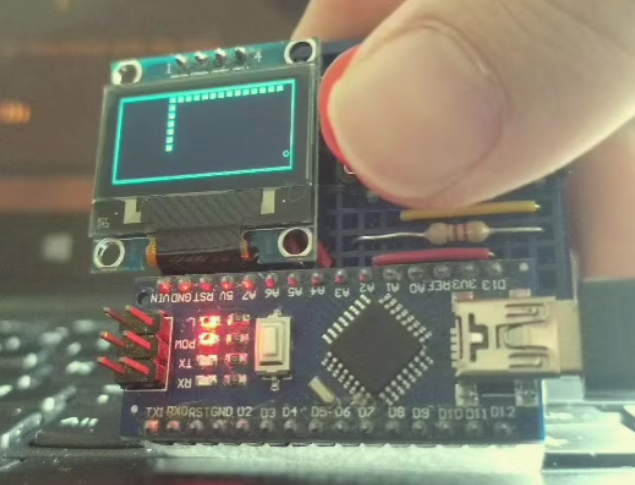
스네이크 게임은 단순한 조작 방식과 쉬운 구현으로 인해 많은 엔지니어들이 애용하는 프로젝트입니다. 본 프로젝트에서는 Arduino Nano와 OLED 디스플레이를 활용하여 브레드보드에서 스네이크 게임을 구현합니다. 버튼을 이용한 방향 조작 및 화면 출력 기능을 포함하여 직접 제작하고 즐길 수 있는 재미있는 프로젝트입니다.
2. 회로도 작성 방법
필요한 부품 및 역할
- Arduino Nano - 전체 시스템을 제어하는 마이크로컨트롤러
- 128x64 OLED 디스플레이 - 게임 화면을 출력하는 역할
- 푸시 버튼 (2개) - 좌우 방향 조작을 담당
- 저항 (1kΩ 2개) - 버튼 신호 안정화를 위해 사용
- 브레드보드 - 모든 부품을 손쉽게 연결할 수 있도록 배치
- 22 AWG 단단한 전선 - 깔끔한 배선 작업을 위해 사용
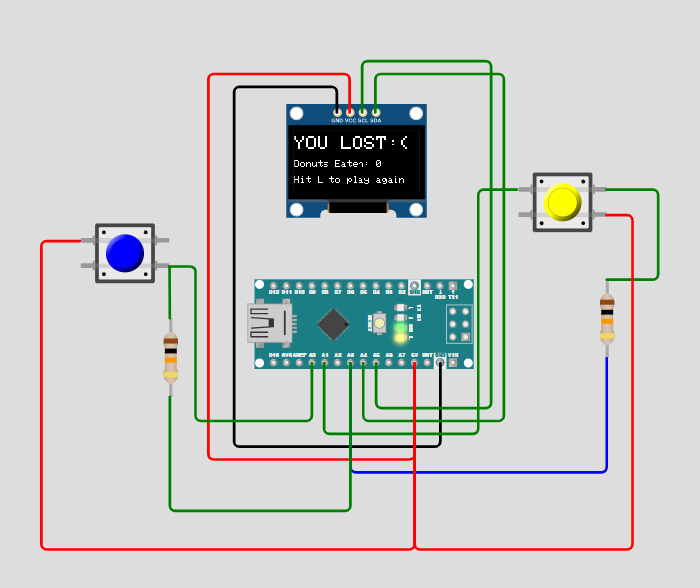
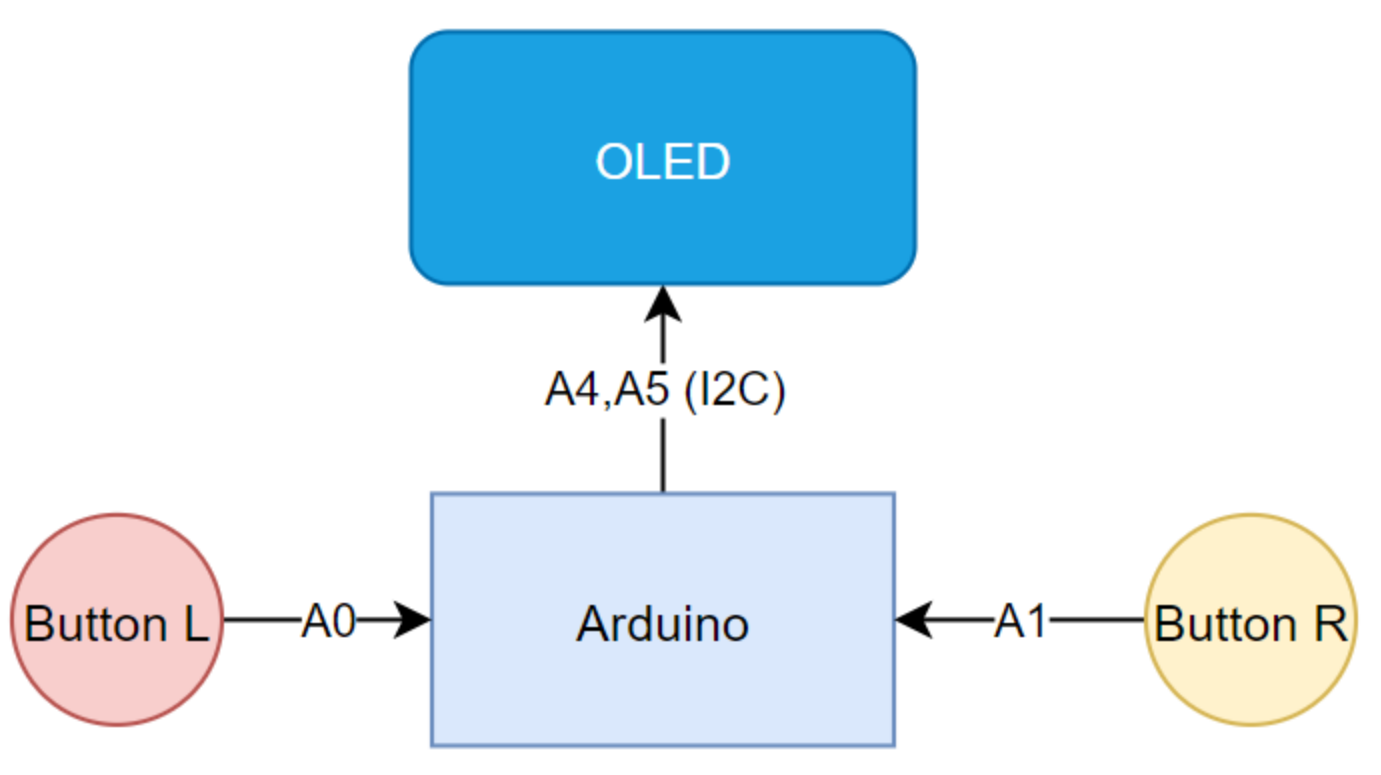
회로 구성도
- OLED 디스플레이 연결
- SDA(A4), SCL(A5) 핀을 사용하여 I2C 방식으로 통신
- VCC는 5V, GND는 Arduino GND 핀에 연결
- 푸시 버튼 연결
- 좌측 버튼
- 입력 핀: A0
- 출력 핀: GND (풀다운 방식)
- 우측 버튼
- 입력 핀: A1
- 출력 핀: GND
- 좌측 버튼
- 저항 연결
- 1kΩ 저항을 버튼과 입력 핀 사이에 연결하여 안정적인 신호 전달
3. 회로 연결 설명
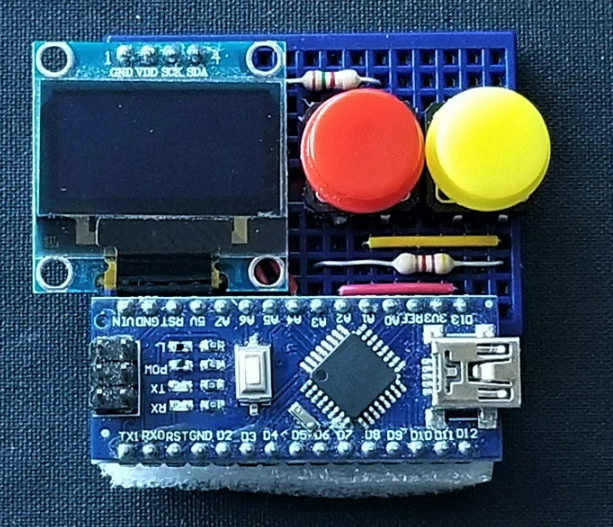
브레드보드에서 컴포넌트를 배치할 때 공간을 효율적으로 활용해야 합니다.
- Arduino Nano를 브레드보드 위에 배치
- OLED 디스플레이를 I2C 방식으로 연결
- 푸시 버튼을 좌우 방향 입력으로 설정
- 버튼을 GND에 연결하여 풀다운 방식으로 동작
- 배선 작업 시 길이를 조절하여 깔끔하게 정리
이렇게 구성하면 작은 공간에서도 효과적으로 회로를 만들 수 있습니다.
4. 소스 설명
초기화 과정
- OLED 디스플레이를 설정하고 초기 화면을 출력
- 버튼 입력을 설정하며, LOW 상태에서 눌림 감지
- 게임 시작 전 Hit L to play 메시지를 출력
스네이크 움직임 처리
- 방향 입력 감지를 위한 버튼 이벤트 처리
- makeSnake() 함수에서 초기 스네이크 설정
- moveSnake() 함수에서 충돌 감지 및 움직임 구현
먹이 생성 및 충돌 처리
- putFood() 함수를 통해 새로운 먹이 생성
- 먹이를 먹을 경우 스네이크 길이 증가 및 점수 업데이트
- 벽과의 충돌 또는 자기 몸과의 충돌 시 게임 종료
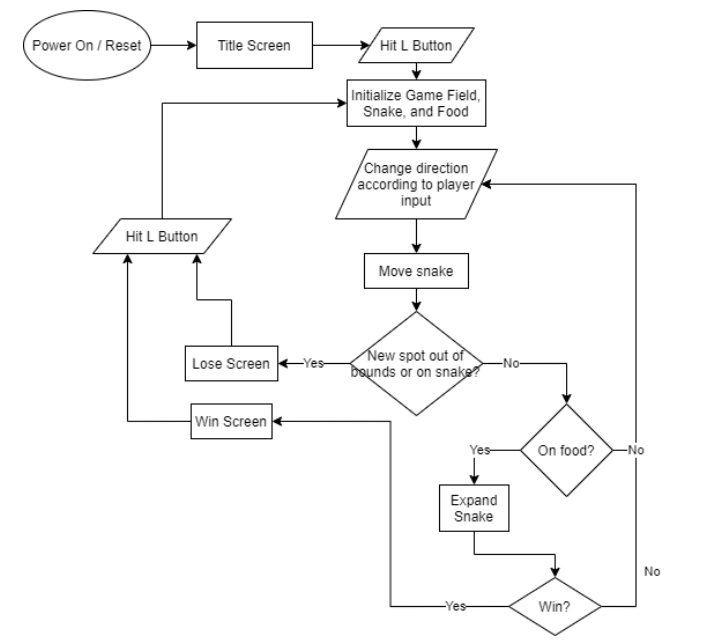
5. 동작 설명
- 게임이 시작되면 초기화 화면이 출력됩니다.
- 버튼 입력을 감지하여 방향 전환을 수행합니다.
- 스네이크가 이동하며 먹이를 먹으면 길이가 늘어납니다.
- 스네이크가 벽에 부딪히거나 자기 몸과 충돌하면 게임이 종료됩니다.
- 승리 조건을 달성하면 축하 메시지가 출력됩니다.
#include <Wire.h>
#include <Adafruit_GFX.h>
#include <Adafruit_SSD1306.h>

//DISPLAY THINGS
#define OLED_RESET    4     // Reset pin # (or -1 if sharing Arduino reset pin)
#define OLED_ADDRESS  0x3C  // I2C address of the display.
#define SCREEN_WIDTH  128   // OLED display width, in pixels
#define SCREEN_HEIGHT 64    // OLED display height, in pixels

//BUTTON THINGS
#define LEFT_B_IN     A0
#define LEFT_B_OUT    A2
#define RIGHT_B_IN    A1
#define RIGHT_B_GND   A3
#define RIGHT_B_OUT   13

//GAME OPTIONS

#define WIN_POINTS 20
#define CYCLE_INTERVAL 500
#define BUTTON_INTERVAL 400

unsigned long previousTime = 0;

//---------DISPLAY STUFF---------

// Declaration for an SSD1306 display connected to I2C (SDA, SCL pins)
Adafruit_SSD1306 display(SCREEN_WIDTH, SCREEN_HEIGHT, &Wire, OLED_RESET);

//Draws a square on the 21x10 board
//(A 128x64 board reduced to 126x60, each element is 6x6)
//x is between 0 and 20 inclusive
//y is between 0 and 9 inclusive
//thing: 0 = erase, 1 = snake, 2 = food
//Could've used a switch statement here...
void drawSquare(byte x, byte y, byte thing)
{
  if (thing == 1){
      display.fillRect(6*x+2,6*y+3,4,4,WHITE);
      return;
  }
  if (thing == 2){
      display.drawRoundRect(6*x+2,6*y+3,4,4,1,WHITE);
      return;
  }
  display.fillRect(6*x+2,6*y+3,4,4,BLACK);
}

//---------SNAKE STUFF---------

//Coordinate struct
//With the size of the game board (21x10), you could technically shrink it to
//1 byte, but I don't quite know how to do that yet.
typedef struct
{
  byte x;
  byte y;
} coord;

//THE SNAKE
//#Apparently snake[] took up so much space that it interfered with the OLED
//#Keep it a reasonable size.
coord snake[100];
byte snakeLength = 2;
short directions[4][2] = {{1,0},{0,1},{-1,0},{0,-1}};
short dirIndex = 0;

coord foodCoord;

//Initializes the snake with an initial length of 2
//and initial direction right.
void makeSnake()
{
  snakeLength = 2;
  snake[0] = {1, (byte) random(0,10)};
  snake[1] = {0, snake[0].y};
  drawSquare(snake[0].x,snake[0].y,1);
  drawSquare(snake[1].x,snake[1].y,1);
  dirIndex = 0;
}

//Modify direction according to button press
void redirect()
{
  unsigned long tempTime = millis();
  bool R = false;
  bool L = false;
  //Listen for button presses
  while (millis()-tempTime < BUTTON_INTERVAL)
  {
    if (digitalRead(LEFT_B_IN)){L = true;}
    if (digitalRead(RIGHT_B_IN)){R = true;}
  }
  //Ignore double presses and non presses
  if (R == L){
    return;
  }
  //If right, increment direction index
  if (R){
    dirIndex++;
    if (dirIndex > 3){dirIndex = 0;}
    return;
  }
  //If left, decrement direction index
  dirIndex--;
  if (dirIndex < 0){dirIndex = 3;}
}

//Moves the snake
bool moveSnake()
{
  //Calculate the new coordinates
  int x = snake[0].x+directions[dirIndex][0];
  int y = snake[0].y+directions[dirIndex][1];

  //If out of bounds, exit and lose.
  if (x > 20 || x < 0 || y > 9 || y < 0)
  {
    return 1;
  }

  coord newHead = {byte(x),byte(y)};
  //Draw the new head
  drawSquare(newHead.x,newHead.y,1);

  //Did we land on food? / Does the new head line up with the food location?
  bool onFood = (newHead.x == foodCoord.x && newHead.y == foodCoord.y);

  //Shift all the snake coords back to make space for the head
  for (int i = snakeLength; i != 0; --i)
  {
    //If the new head contacts any snake coord, exit and lose
    if (!onFood && newHead.x == snake[i].x && newHead.y == snake[i].y)
    {
      return 1;
    }
    snake[i] = snake[i-1];
  }

  //If nothing wrong, set the new head of the snake.
  snake[0] = newHead;

  //If no food, erase tail
  if (!onFood)
  {
    drawSquare(snake[snakeLength].x,snake[snakeLength].y,0);
  }
  //Else dont erase tail, increment length of snake,
  //and put a new food
  else
  {
    snakeLength++;
    putFood();
  }
  return 0;
}

//Puts a new piece of food on the game board.
void putFood()
{
  bool foodOkay = false;
  //Make sure the food doesnt fall on top of the snake
  while (!foodOkay)
  {
    foodCoord = {byte(random(0,21)),byte(random(0,10))};
    foodOkay = true;
    for (byte i = 0; i < snakeLength; ++i)
    {
      if (foodCoord.y == snake[i].y && foodCoord.x == snake[i].x)
      {
        foodOkay = false;
        break;
      }
    }
  }
  drawSquare(foodCoord.x,foodCoord.y,2);
}

void setup()
{
  //Serial.begin(9600);

  // SSD1306_SWITCHCAPVCC = generate display voltage from 3.3V internally
  if(!display.begin(SSD1306_SWITCHCAPVCC, OLED_ADDRESS)) {
    //Serial.println(F("Oh no"));
    for(;;);
  }

  //Random numbers
  randomSeed(analogRead(7));

  //Set up the buttons
  //Left button
  pinMode(LEFT_B_IN, INPUT);
  pinMode(LEFT_B_OUT, OUTPUT);
  digitalWrite(LEFT_B_OUT,1);

  //Right button
  pinMode(RIGHT_B_IN, INPUT);
  pinMode(RIGHT_B_GND, OUTPUT);
  pinMode(RIGHT_B_OUT, OUTPUT);
  digitalWrite(RIGHT_B_OUT,1);
  digitalWrite(RIGHT_B_GND,0);


  //Set up the title screen
  display.clearDisplay();
  display.setTextSize(3);
  display.setTextColor(WHITE);
  display.setCursor(20,5);
  display.println(F("SNAKE"));
  display.setTextSize(1);
  display.setCursor(26,40);
  display.println(F("Hit L to play"));
}


//Game loop
void loop() {

  display.display();
  //Wait for user input
  while (!digitalRead(LEFT_B_IN)){}

  //GAME SETUP
  //Set up borders
  display.clearDisplay();
  display.fillRect(0,0,128,2,WHITE);
  display.fillRect(0,62,128,2,WHITE);
  display.fillRect(0,0,1,64,WHITE);
  display.fillRect(127,0,1,64,WHITE);

  //Make the snake and place the food
  makeSnake();
  putFood();
  display.display();
  bool win = false;
  delay(800);

  //Start game
  for(;;)
  {
    //Every cycle
    if (millis() - previousTime > CYCLE_INTERVAL)
    {
      previousTime = millis();
      //Check for direction change
      redirect();
      //Self contact/Out of bounds condition
      if (moveSnake())
      {
        break;
      }
      if (snakeLength == WIN_POINTS+2)
      {
        win = true;
        break;
      }
      display.display();
    }
  }

  if (win)
  {
    display.clearDisplay();
    display.setTextSize(2);
    display.setTextColor(WHITE);
    display.setCursor(0,5);
    display.println(F("YOU WON :)"));
  }
  //Show lose screen
  else
  {
    //Flash the screen
    display.invertDisplay(true);
    delay(400);
    display.invertDisplay(false);
    delay(400);
    display.invertDisplay(true);
    delay(400);
    display.invertDisplay(false);
    delay(400);

    //Loss text
    display.clearDisplay();
    display.setTextSize(2);
    display.setTextColor(WHITE);
    display.setCursor(0,5);
    display.println(F("YOU LOST:("));
  }
  display.setTextSize(1);
  display.setCursor(0,30);
  display.print(F("Donuts Eaten: "));
  display.print(snakeLength-2);
  display.println();
  display.println();
  display.println(F("Hit L to play again"));
}
basic_snake.ino
0.01MB
아두이노나노 스케이크 게임.zip
0.01MB
6. 결론
본 프로젝트는 Arduino 및 OLED 디스플레이를 활용한 스네이크 게임 구현을 목표로 합니다. 작은 공간에서도 기능을 완벽히 구현할 수 있도록 최적화된 회로 배치와 코드 설계가 중요합니다.
추후 프로젝트 확장 아이디어:
- 배터리 연결을 통해 휴대성을 강화
- 추가적인 게임 기능 적용
- 더 작은 기판에서 실행할 수 있도록 최적화
이제 직접 코드를 테스트하면서 개선할 부분을 찾아보는 것도 재미있겠네요! 🚀🎮 더 발전시키고 싶다면 언제든지 이야기해 주세요! 😃
728x90
반응형
'아두이노' 카테고리의 다른 글
| 서보모터(Servo Motor) 사용 방법 및 회로 구성 (1) | 2025.05.22 |
|---|---|
| DIY 초음파 거리 측정 및 객체 탐지 시스템 (0) | 2025.05.20 |
| 초음파 센서를 이용한 음계 변환 회로 설계 (0) | 2025.05.20 |
| 🎹 아두이노로 1옥타브 피아노 만들기! (0) | 2025.05.17 |
| 🚀 Arduino I2C LCD를 활용한 자동 이동 캐릭터 (0) | 2025.05.15 |


