728x90
반응형
물체 감지 모델을 실행하기 위해 DumbDisplay와 TensorFlow Lite를 함께 사용하는 방법에 대해 두 가지 데모를 제공하고 있습니다.
하나는 Arduino UNO와 함께 사용하고, 다른 하나는 ESP32-CAM과 함께 사용하는 방법입니다.
먼저, Arduino UNO와 DumbDisplay를 사용하는 경우에는 다음과 같은 단계를 따르면 됩니다.
Arduino IDE를 열고, 메뉴에서 "Tools" → "라이브러리 관리"를 선택합니다.
검색 상자에 "dumbdisplay"를 입력하여 DumbDisplay Arduino 라이브러리를 찾습니다.
라이브러리를 선택하고 "Install" 버튼을 클릭하여 설치합니다.
설치가 완료되면 Arduino UNO에 연결된 DumbDisplay를 사용하여 물체 감지 모델을 실행할 수 있습니다.
또한, Android 휴대전화와 DumbDisplay를 함께 사용하는 경우에는 다음 단계를 따릅니다.
Android 휴대전화에서 Google Play 스토어에 접속하여 "DumbDisplay" 앱을 검색하여 설치합니다.
앱을 실행하고, 휴대전화를 DumbDisplay로 설정합니다.
Arduino UNO와 DumbDisplay를 연결하고, 휴대전화의 DumbDisplay 앱을 통해 물체 감지 모델을 실행할 수 있습니다.
Arduino UNO의 제한된 강력성으로 인해 Arduino UNO를 사용하여 AI 개체 감지 모델을 실행할 것으로 기대하는 것은 실용적이지 않을 수 있습니다. 그럼에도 불구하고 TensorFlow Lite를 실행하는 무거운 작업을 상대적으로 훨씬 더 강력한 휴대폰에 위임할 수 있기 때문에 재미를 멈추지 않습니다.
과연 이것이 방향이다. DumbDisplay를 통해 마이크로 컨트롤러가 운전을 수행하지만 TensorFlow Lite로 물체 감지 모델을 실행하는 것은 휴대폰입니다.
이 게시물에서는 두 가지 데모를 제공합니다. Arduino UNO와 하나; 하나는 ESP32-CAM과 함께 합니다.
1단계: 준비

여기에 표시된 스케치를 컴파일하고 실행하려면 먼저 DumbDisplay Arduino 라이브러리를 설치해야 합니다. Arduino IDE를 엽니다. 메뉴 항목으로 이동 Tools | 라이브러리를 관리하고 검색 상자에 "dumbdisplay"를 입력합니다.
다른 쪽(Android 휴대전화 쪽)에는 DumbDisplay Android 앱을 설치해야 합니다.
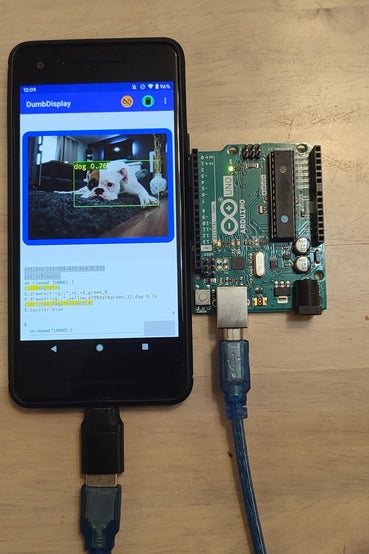
2단계: 아두이노 UNO 데모
첫 번째 데모는 Arduino UNO에서 실행됩니다.
DumbDisplay Android 앱이 선택한 URL에서 이미지를 다운로드하도록 유도합니다.
이미지를 성공적으로 다운로드한 후 다운로드한 이미지를 DumbDisplay에 그립니다.
그런 다음 다운로드한 이미지에서 TensorFlow Lite를 사용하여 예제 객체 감지 모델을 실행하도록 DumbDisplay Android 앱에 요청을 보냅니다.
물체 감지 결과를 다시 가져오면 그려진 이미지에 표시됩니다.
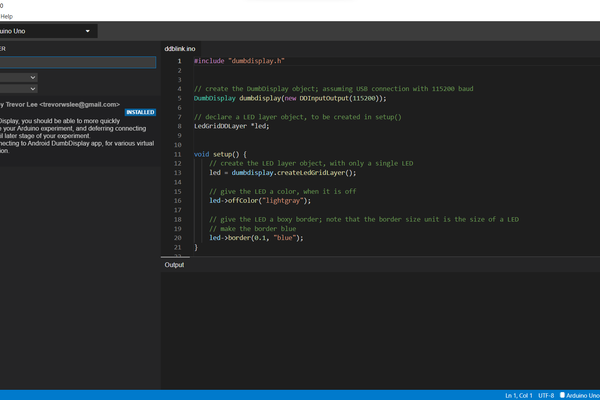
3단계: 아두이노 UNO 데모 스케치
스케치는 Arduino UNO로 실행할 수 있을 뿐만 아니라 Arduino Nano 또는 ESP32와 같은 다른 유형의 마이크로 컨트롤러 보드로 실행할 수 있습니다. 여기에서 스케치를 다운로드할 수 있습니다.
ESP32로 실행할 때 DumbDisplay Android 앱에 대한 Bluetooth 연결은 BT32(참조)라는 이름으로 설정됩니다. 그렇지 않으면 Arduino UNO의 경우와 같이 OTG 연결이 가정됩니다(참조).
#if defined(ESP32)
  // ESP32 board ... additional use Bluetooth with name "BT32"
  #include "esp32dumbdisplay.h"
  DumbDisplay dumbdisplay(new DDBluetoothSerialIO("BT32", true, 115200));
#else
  #include "dumbdisplay.h"
  DumbDisplay dumbdisplay(new DDInputOutput(115200));
#endif
"그래픽 DD 레이어"가 생성되고 이미지 등을 그리기 위한 설정이 이루어집니다.
  graphical = dumbdisplay.createGraphicalLayer(640, 480);
  graphical->border(10, "blue", "round");
  graphical->padding(15);
  graphical->backgroundColor("white");
  graphical->penSize(2);
640x480은 다운로드한 이미지의 이미지 크기입니다.
이미지 다운로드는 연결된 DumbDisplay Android 앱에 대한 "이미지 다운로드 터널"을 통해 이루어집니다
web_image_tunnel = dumbdisplay.createImageDownloadTunnel("", "downloaded.png");
웹 이미지는 다운로드된 .png 이름으로 휴대폰에 다운로드되고 저장되며 DumbDisplay Android 앱은 휴대폰 저장소에 액세스하려면 사용자의 권한이 필요합니다(DumbDisplay 앱에만 해당). DumbDisplay 앱의 설정 페이지에서 이 작업을 수행합니다.
다운로드한 이미지에 대한 이미지 감지는 "객체 감지 데모 서비스 터널"을 통해 이루어집니다.
object_detect_tunnel = dumbdisplay.createObjectDetectDemoServiceTunnel();
웹 이미지는 다른 URL에서 다운로드되어 그래픽 계층에 그려집니다.
const char* getDownloadImageURL() {
  // randomly pick an image source URL from a list
  int idx = random(5);
  switch(idx) {
    case 0: return "https://placekitten.com/640/480";
    case 1: return "https://source.unsplash.com/random/640x480";
    case 2: return "https://picsum.photos/640/480";
    case 3: return "https://loremflickr.com/640/480";
  }
  return "https://placedog.net/640/480?r";
}
...
    String url = getDownloadImageURL();
    web_image_tunnel->reconnectTo(url);
...
       // web image downloaded and saved successfully
        graphical->drawImageFile("downloaded.png");
        // detect objects in the image
        object_detect_tunnel->reconnectForObjectDetect("downloaded.png");
...
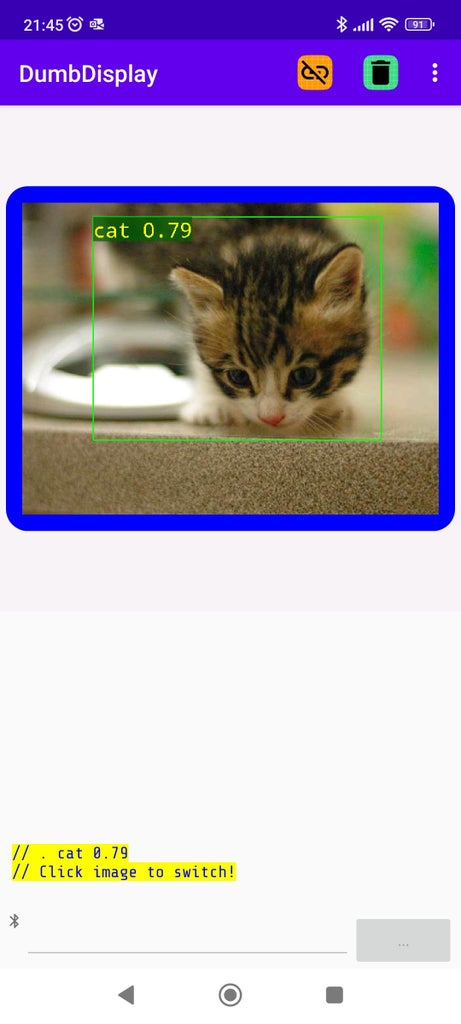
다운로드한 이미지를 그린 후 "객체 감지 터널"이 호출되어 객체 감지를 수행합니다.
그리고 물체 감지 결과는 다음과 같이 처리됩니다.
        DDObjectDetectDemoResult objectDetectResult;
        if (object_detect_tunnel->readObjectDetectResult(objectDetectResult)) {
          dumbdisplay.writeComment(String(". ") + objectDetectResult.label);
          int x = objectDetectResult.left;
          int y = objectDetectResult.top;
          int w = objectDetectResult.right - objectDetectResult.left;
          int h = objectDetectResult.bottom - objectDetectResult.top;
          graphical->drawRect(x, y, w, h, "green");
          graphical->drawStr(x, y, objectDetectResult.label, "yellow", "a70%darkgreen", 32);
        }
또 하나. 다른 웹 이미지를 다운로드하고 싶다면 이미지 감지 재미를 위해 DumbDisplay Android 앱에서 다운로드한 이미지를 클릭하세요.
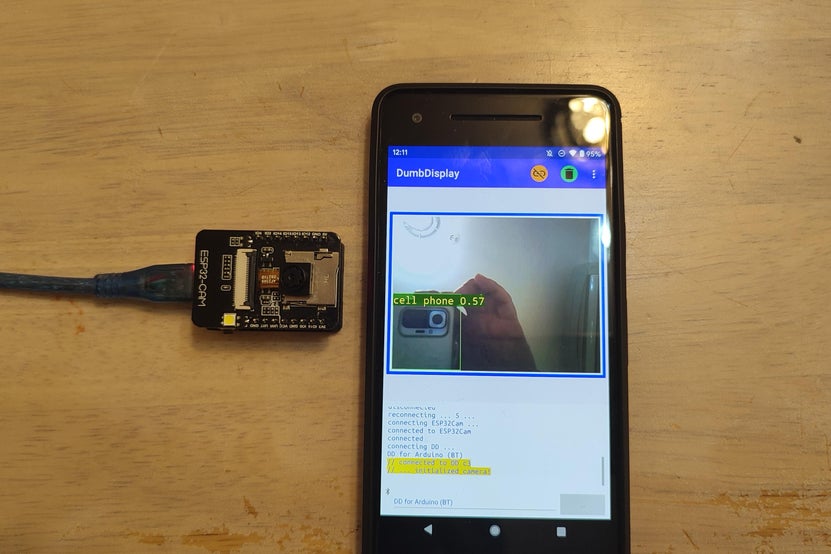
4단계: ESP32-CAM 데모
ESP32-CAM 데모는 ESP32-CAM에 대한 이전 실험에서 파생되었습니다. 설정 단계는 이전 YouTube 비디오 ESP32-CAM 실험 - 휴대폰으로 사진 캡처 및 스트리밍을 참조 할 수 있습니다.
스케치는 Andrino UNO 데모에 표시된 것과 유사한 코드를 포함할 뿐만 아니라 부착된 OV2640 카메라 모듈을 구동하는 코드도 포함하기 때문에 꽤 깁니다. 여기에서 스케치를 다운로드할 수 있습니다.
기본적
ESP32-CAM은 OV2640을 구동하여 실시간으로 이미지(VGA 해상도)를 지속적으로 캡처합니다.
캡처된 이미지는 [캐싱을 위해] DumbDisplay 앱으로 전송됩니다.
ESP32-CAM은 DumbDisplay 앱에 캐시된 이미지를 그립니다.
병렬과 마찬가지로 ESP32-CAM은 DumbDisplay 앱을 구동하여 캐시된 이미지에서 개체 감지를 수행합니다.
ESP32-CAM이 물체 감지 결과를 수신하면 표시된 이미지에 물체 마커를 오버레이합니다.
기본적으로 ESP32Cam이라는 이름의 Bluetooth를 통해 DumbDisplay 앱에 연결됩니다.
#define BLUETOOTH


#ifdef BLUETOOTH
  #include "esp32dumbdisplay.h"
  DumbDisplay dumbdisplay(new DDBluetoothSerialIO("ESP32Cam"));
#else
  #include "wifidumbdisplay.h"
  const char* ssid = <wifi SSID>;
  const char* password = <wifi password>;
  DumbDisplay dumbdisplay(new DDWiFiServerIO(ssid, password));
#endif
그럼에도 불구하고 원하는 경우 연결에 WIFI를 사용할 수 있습니다. BLUETOOTH를 정의하는 줄을 주석 처리하고 적절한 WIFI ssid와 암호를 입력하기만 하면 됩니다.
결합된 두 개의 "그래픽 레이어"(하나는 다른 레이어 위에 있음)는 캡처된 이미지와 물체 감지 마커를 표시하는 데 사용됩니다.
  // create the top layer for showing detected object rectangles
  objectLayer = dumbdisplay.createGraphicalLayer(imageLayerWidth, imageLayerHeight);
  objectLayer->border(10, "blue");
  objectLayer->padding(5);
  objectLayer->noBackgroundColor();
  objectLayer->penSize(2);

  // create the bottom layer for showing the ESP32 CAM capatured image
  imageLayer = dumbdisplay.createGraphicalLayer(imageLayerWidth, imageLayerHeight);
  imageLayer->border(10, "blue");
  imageLayer->padding(5);
  imageLayer->backgroundColor("azure");
- objectLayer(맨 위에 겹쳐짐)는 개체 마커를 표시하기 위한 것입니다.
- imageLayer는 캡처된 이미지를 표시하기 위한 것입니다.
루프 로직 흐름은 기본적으로 다음과 같습니다.
...
    if (captureAndSaveImage(false, true)) {
      imageLayer->drawImageFileFit(imageName);
      ...
          int x = objectDetectResult.left;
          int y = objectDetectResult.top;
          int w = objectDetectResult.right - objectDetectResult.left;
          int h = objectDetectResult.bottom - objectDetectResult.top;
          objectLayer->drawRect(x, y, w, h, "green");
          objectLayer->drawStr(x, y, objectDetectResult.label, "yellow", "a70%darkgreen", 32);
      ...
    }
...
5단계: 즐기세요!
이 데모를 재미있게 즐기시기 바랍니다!
예, ESP32는 TensorFlow Lite를 실행할 수 있습니다. 실제로 ESP32 내에서 TensorFlow Lite를 실행하는 더 많은 AI 데모를 제시하기를 바랍니다. 그때까지 즐기세요!
728x90
반응형
'아두이노' 카테고리의 다른 글
| Visual DIY Workbench로 전자 및 프로그래밍 (0) | 2023.12.19 |
|---|---|
| Mega328 마이크로컨트롤러 아두이노 다운로드(1/2) (0) | 2023.12.19 |
| 불가능한 LED 크리스마스 트리 -Impossible LED Christmas Tree (3) | 2023.11.26 |
| Arduino LED 깜박임 -Arduino LED Blinking (2) | 2023.11.20 |
| MAX7219 LED 매트릭스 디스플레이(Arduino 튜토리얼 포함) (1) | 2023.11.20 |


