728x90
반응형
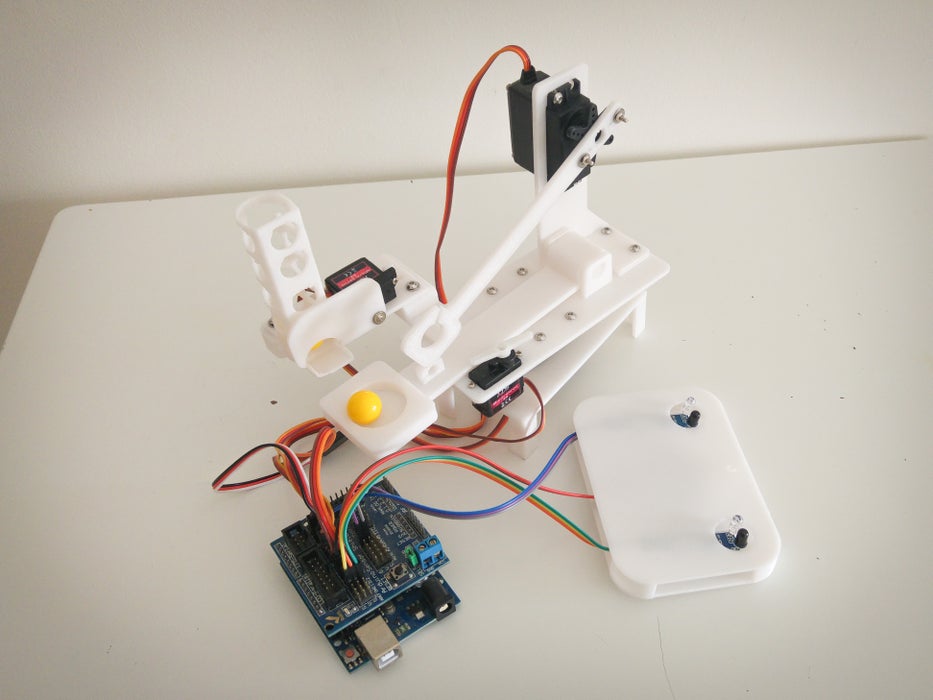
안녕하세요! 이번 포스트에서는 저만의 로봇 투석기 프로젝트를 소개합니다. 이 투석기는 완전히 자동화된 장난감으로, 자동 장전 및 핸즈프리 조작이라는 멋진 기능을 제공합니다. 투석기에는 매거진과 장전 메커니즘이 포함되어 있어 끊임없이 공을 장전하고 발사할 수 있습니다. 이제 여러분도 따라 만들어 보세요!
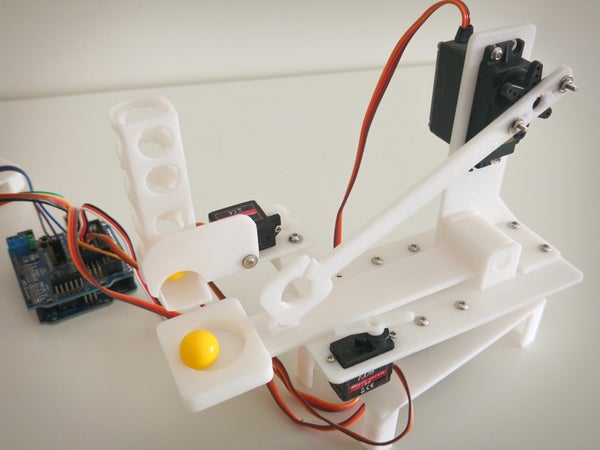
1단계: 투석기 조립
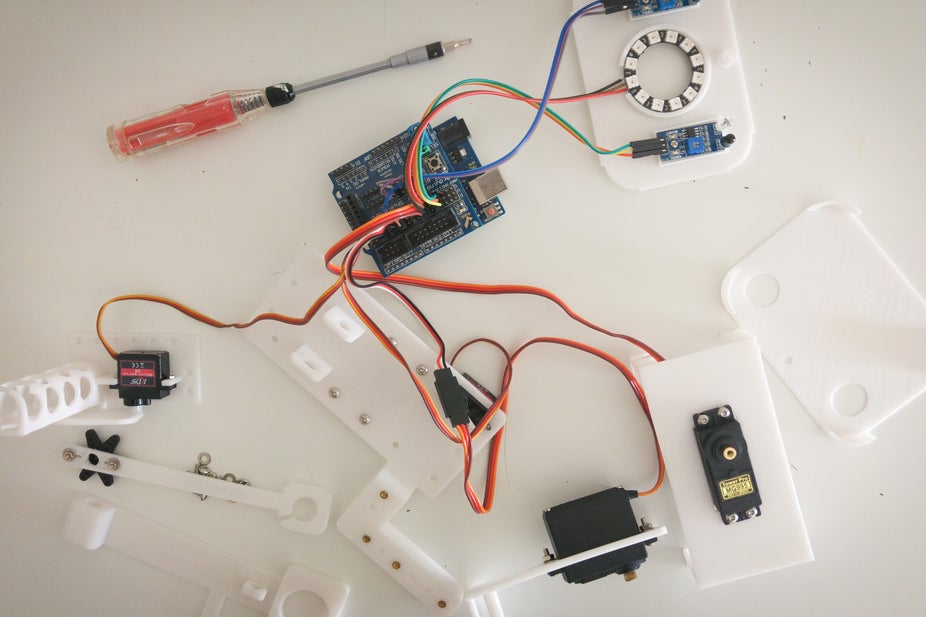
필요한 부품 목록:
- 탄알: 15mm 볼
- 3D 프린팅 부품: 필요한 부품은 여기에서 다운로드 가능
- 전자 및 기타 부품:
- 2x MG995 서보 모터
- 2x SG90 9G 서보 모터
- 아두이노 우노 보드
- Arduino Uno 센서 실드
- 외부 전원 공급 장치 (2A, 5V 권장)
- 나사 및 너트: M3 나사(20개), 너트(20개), 황동 너트(20개), M2 나사 및 너트(8개)
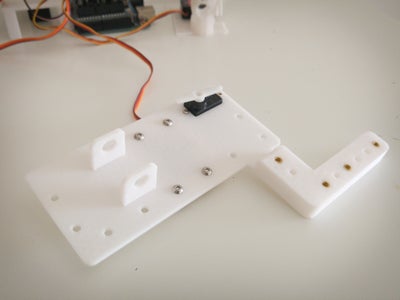
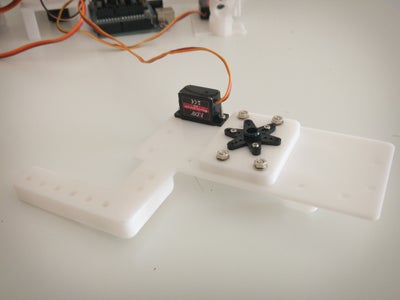
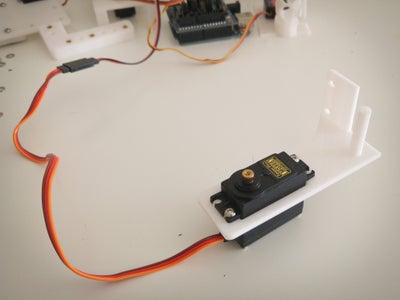
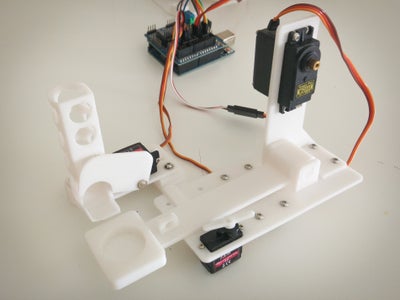
조립 방법:
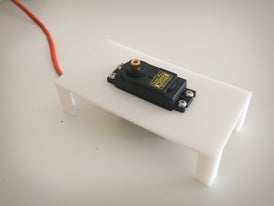
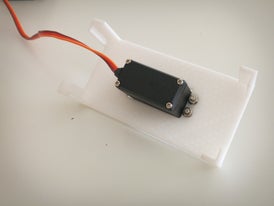
- 3D 프린팅 부품을 사용해 투석기의 주요 구조를 형성합니다.
- M3 황동 너트를 열로 삽입합니다(납땜 인두를 사용).
- 위에서 언급된 부품들을 순서대로 조립하여 투석기를 완성합니다.


Arduino Catapult - 1562928.zip
8.70MB
controller_bottom.stl
0.06MB
controller_top.stl
0.04MB
2단계: 투석기 회로 연결 및 작동
서보 모터 연결: 서보 모터를 아두이노 우노의 PWM 핀에 연결합니다.
- 베이스 모터: 핀 9
- 트레이 모터: 핀 6
- 암 모터: 핀 5
- 트레이 잠금 모터: 핀 3
전원 공급:
- 외부 전원 공급 장치를 사용하여 서보 모터에 전력을 공급합니다.
- 센서 실드를 전원 공급 장치에 연결하고, 전원 점퍼를 제거하여 외부 전원을 사용하도록 설정합니다.
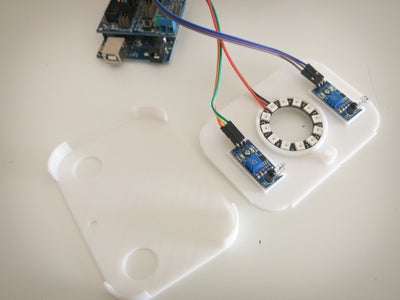
3단계: 코드 작성 및 생명 불어넣기
아래는 투석기를 제어하는 기본 코드를 공유합니다. 핸즈프리 컨트롤러와 애니메이션 LED 링도 포함되어 있습니다!
#include <Servo.h>
#include <Adafruit_NeoPixel.h>

#define PIN_LED_RING 8
#define NUM_PIXELS 12

Servo baseMotor, trayMotor, armMotor, trayLockMotor;
Adafruit_NeoPixel ledRing(NUM_PIXELS, PIN_LED_RING, NEO_GRB + NEO_KHZ800);

#define IR_SENSOR_LEFT 2
#define IR_SENSOR_RIGHT 3

void setup() {
  baseMotor.attach(9);
  trayMotor.attach(6);
  armMotor.attach(5);
  trayLockMotor.attach(3);

  pinMode(IR_SENSOR_LEFT, INPUT);
  pinMode(IR_SENSOR_RIGHT, INPUT);

  ledRing.begin();
  ledRing.show();  // LED 꺼짐 상태
}

void loop() {
  int leftSensor = digitalRead(IR_SENSOR_LEFT);
  int rightSensor = digitalRead(IR_SENSOR_RIGHT);

  // 센서 상태에 따라 조작
  if (leftSensor == HIGH && rightSensor == LOW) {
    rotateLeft();
  } else if (leftSensor == LOW && rightSensor == HIGH) {
    rotateRight();
  } else if (leftSensor == HIGH && rightSensor == HIGH) {
    fireCatapult();
  } else {
    idleAnimation();
  }
}

void rotateLeft() {
  baseMotor.write(45);
}

void rotateRight() {
  baseMotor.write(135);
}

void fireCatapult() {
  trayMotor.write(90);  // 장전
  delay(500);
  armMotor.write(180);  // 발사
  delay(500);
  trayLockMotor.write(0);  // 재장전 위치로
}

void idleAnimation() {
  for (int i = 0; i < NUM_PIXELS; i++) {
    ledRing.setPixelColor(i, ledRing.Color(0, 0, 255));  // 파란색 애니메이션
  }
  ledRing.show();
  delay(100);
}
#include <Servo.h>

Servo lockServo ;
Servo armServo ;
Servo trayServo ;
Servo baseServo ;

#define lockOpen    110
#define lockClosed  20

#define armOpen     140
#define armArmed    45

#define trayClosed  165
#define trayOpened  155


void rest() {

  sweep(lockServo,lockServo.read(),lockOpen,15) ;
  sweep(armServo,armServo.read(),armOpen,15) ;

}

void prepareToShoot() {

  sweep(lockServo,lockServo.read(),lockClosed,15) ;
  sweep(armServo,armServo.read(),armArmed,15) ;

}

void shoot() {

  sweep(lockServo,lockServo.read(),lockOpen,15) ;

}


void sweep ( Servo servo , int from , int to , int speed  ) {

  int pos = 0 ;

  if (from < to) {

    for (pos = from; pos <= to; pos += 1) {
      servo.write(pos);
      delay(speed);
    }

  } else {

    for (pos = from; pos >= to; pos -= 1) {
      servo.write(pos);
      delay(speed);
    }


  }


}


void trayClose(){
  sweep(trayServo,trayServo.read(),trayClosed,22) ;
}

void trayOpen() {
  sweep(trayServo,trayServo.read(),trayOpened,22) ;
}

void trayRelease() {

    trayClose() ;
    trayOpen() ;
    trayClose() ;
    delay(2000);

}


void setup() {

  /// connect servo motors

  lockServo.attach(3);
  armServo.attach(5);
  trayServo.attach(6);
  baseServo.attach(9) ;


  trayClose();
  delay(2500); /// you have time to load bullets
  trayRelease();


  rest() ;
  prepareToShoot() ;
  shoot();
  rest();


}

void loop() {


  /// do your magic here ...


}
4단계: LED 링을 활용한 애니메이션 추가
LED 링을 사용하여 투석기에 생동감을 더합니다. 유휴 상태에서는 파란색 애니메이션이 재생되고, IR 센서의 움직임에 따라 방향을 조절하며 발사합니다.

#include <Adafruit_NeoPixel.h>
#include <SoftwareServo.h>

SoftwareServo  lockServo ;
SoftwareServo  armServo ;
SoftwareServo  trayServo ;
SoftwareServo  baseServo ;

#define lockOpen    110
#define lockClosed  20

#define armOpen     140
#define armArmed    45

#define trayOpened  164
#define trayClosed  167


#define ringPin     10

#define irPinRight  12
#define irPinLeft   4

int basePos = 90 ;


unsigned long lastTimer = millis();


unsigned long pixelTimer = millis();
int currentPixelLed = 0 ;


Adafruit_NeoPixel strip = Adafruit_NeoPixel(12, ringPin, NEO_GRB + NEO_KHZ800);

void rest() {

  sweep(lockServo,lockServo.read(),lockOpen,15) ;
  sweep(armServo,armServo.read(),armOpen,15) ;

}

void prepareToShoot() {

  sweep(lockServo,lockServo.read(),lockClosed,15) ;
  sweep(armServo,armServo.read(),armArmed,15) ;

}

void shoot() {

  sweep(lockServo,lockServo.read(),lockOpen,15) ;

}


void sweep ( SoftwareServo  &servo , int from , int to , int speed  ) {

  int pos = 0 ;

  if (from < to) {

    for (pos = from; pos <= to; pos += 1) {
      servo.write(pos);
      delay(speed);
      SoftwareServo::refresh();
    }

  } else {

    for (pos = from; pos >= to; pos -= 1) {
      servo.write(pos);
      delay(speed);
      SoftwareServo::refresh();
    }


  }


}


void trayClose(){
  sweep(trayServo,trayServo.read(),trayClosed,22) ;
}

void trayOpen() {
  sweep(trayServo,trayServo.read(),trayOpened,22) ;
}

void trayRelease() {

    trayOpen() ;
    trayClose() ;
    delay(2000);

}


void ringAllOff() {

    for (int pixel = 0 ; pixel<12 ; pixel++ ) {
      strip.setPixelColor(pixel, 0, 0, 0);
    }

    strip.show();

}


#define animIdle        0
#define animTurnRight   1
#define animTurnLeft    2
#define animTurnShoot   3

int animMode = animIdle ;


void animCircle() {


  unsigned long currentTimer = millis();

  if ( (currentTimer - pixelTimer) > 80  ) {

    pixelTimer = currentTimer ;

    ringAllOff() ;
    strip.setPixelColor(currentPixelLed, 50, 250, 50);
    strip.show();

    currentPixelLed++ ;
    if (currentPixelLed==12) currentPixelLed = 0 ;

  }

}


int currentColorRed = 0 ;
int currentColorGreen = 0 ;
int currentColorBlue = 0 ;

void animFade() {


  unsigned long currentTimer = millis();

  if ( (currentTimer - pixelTimer) > 30  ) {

    pixelTimer = currentTimer ;


    for (int i = 0 ; i < 12 ; i++) {
      strip.setPixelColor(i, currentColorRed/4, currentColorGreen, currentColorBlue/4);
    }


    strip.show();

    currentColorRed+=2 ;
    currentColorGreen+=2 ;
    currentColorBlue+=2 ;

    if (currentColorRed>=255) currentColorRed = 0 ;
    if (currentColorGreen>=200) currentColorGreen = 0 ;
    if (currentColorBlue>=255) currentColorBlue = 0 ;

  }

}


void animRight() {


  unsigned long currentTimer = millis();

  if ( (currentTimer - pixelTimer) > 10  ) {

    pixelTimer = currentTimer ;

    ringAllOff() ;

    strip.setPixelColor(2, currentColorRed, currentColorRed/2, currentColorRed/3);
    strip.setPixelColor(3, currentColorRed, currentColorRed/3, currentColorRed/2);
    strip.setPixelColor(4, currentColorRed, currentColorRed/2, currentColorRed/3);
    strip.setPixelColor(5, currentColorRed, currentColorRed/3, currentColorRed/2);
    strip.setPixelColor(6, currentColorRed, currentColorRed/2, currentColorRed/3);

    currentColorRed+=2 ;
    if (currentColorRed>=155) currentColorRed = 0 ;

    strip.show();

  }


}


void animLeft() {


  unsigned long currentTimer = millis();

  if ( (currentTimer - pixelTimer) > 10  ) {

    pixelTimer = currentTimer ;

    ringAllOff() ;

    strip.setPixelColor(8, currentColorRed, currentColorRed/2, currentColorRed/3);
    strip.setPixelColor(9, currentColorRed, currentColorRed/3, currentColorRed/2);
    strip.setPixelColor(10, currentColorRed, currentColorRed/2, currentColorRed/3);
    strip.setPixelColor(11, currentColorRed, currentColorRed/3, currentColorRed/2);
    strip.setPixelColor(0, currentColorRed, currentColorRed/2, currentColorRed/3);

    currentColorRed+=2 ;
    if (currentColorRed>=155) currentColorRed = 0 ;

    strip.show();

  }


}

void animShoot() {


    for (int i = 0 ; i < 12 ; i++) {
      strip.setPixelColor(i, 250, 10, 10);
    }

    strip.show();
}

void animateRing() {


    if (animMode == animIdle) animCircle();
    if (animMode == animTurnRight) animRight();
    if (animMode == animTurnLeft) animLeft();


}


void setup() {


  /// prepare led ring

  strip.begin();
  strip.show();
  strip.setBrightness(128);

  animateRing() ;

  /// prepare ir sensors

  pinMode(irPinRight, INPUT);
  pinMode(irPinLeft, INPUT);


  /// setup servo motors

  lockServo.attach(3);
  armServo.attach(5);
  trayServo.attach(6);
  baseServo.attach(9) ;


  /// basic setup

  armServo.write(armArmed);
  trayServo.write(trayClosed);
  lockServo.write(lockOpen);
  delay(100);
  SoftwareServo::refresh();
  armServo.write(armOpen);
  delay(100);
  SoftwareServo::refresh();


  /// test tray

  //trayRelease(); trayRelease(); trayRelease();trayRelease(); trayRelease(); trayRelease();


}

void loop() {

  animateRing() ;


  unsigned long currentTimer = millis();


  int l ; int r ;

  l = digitalRead(irPinLeft);
  r = digitalRead(irPinRight);

  if (r == 0 && l == 0) {

    if ( (currentTimer - lastTimer) > 250  ) {

      lastTimer = currentTimer ;

      /// shoot!!!!
      animShoot();

      trayRelease();

      rest() ;
      prepareToShoot() ;
      shoot();
      rest();

    }


  } else if (r == 0 || l == 0 ) {


    if ( (currentTimer - lastTimer) > 25  ) {

      lastTimer = currentTimer ;

      if (r==0) {

        basePos-- ;
        animMode = animTurnLeft ;

      } else {

        basePos++ ;
        animMode = animTurnRight ;

      }


      baseServo.write(basePos);

    }


  } else {

    animMode = animIdle ;

  }


  SoftwareServo::refresh();


}
이로써 자동화된 로봇 투석기를 완성할 수 있습니다! 여러분의 프로젝트에 활력을 불어넣길 바라며, 궁금한 점은 언제든지 댓글로 남겨주세요. 즐거운 제작 되세요! 🚀
728x90
반응형
'모빌리티 프로젝트' 카테고리의 다른 글
| DIY: 리튬 배터리의 SoC 및 SoH를 표시하는 소형 LED 장치 만들기 (0) | 2025.04.02 |
|---|---|
| DIY 3D 프린팅 Pi 솔라 카 만들기 (0) | 2025.04.02 |
| Bob The Robot: 아두이노 기반 로봇 프레임워크 제작기 (0) | 2025.03.28 |
| 4족 이동 로봇 설계 및 제작 (0) | 2025.03.25 |
| 3D 프린팅 온로드 RC 경주용 자동차 프로젝트 (0) | 2025.03.21 |


